Learn how you can print 3D masks & shields too.
Printing masks for the community has been a project I was excited to be a part of. We initially found out about this project through Lowell Makes and their call to action for 3D printed masks. They’ve requested the community prints as many 3D printed masks as possible, as well as manufacturing face shields to combat the COVID-19 health crisis.
The steps outlined on the Lowell Makes COVID-19 Response page covers everything you need to know, but I’ll outline my personal process here.
- For reference, I’m using a Makerbot Replicator Z18. First, I downloaded the print files from the Lowell Makes thingiverse. I set up the print, arranging as many masks as I could fit on the build plate (in my case I was able to get 4 at a time). After the first set of prints, I realized that the covid_mask_grid.stl print fit very tightly, so I scaled it down to 98% and found it fit much more easily. Your results may vary but try one print at full scale and adjust if necessary.
- I left all the Makerbot’s default settings, except I dropped the infill density to 5%, the layer height to 0.3mm, and the chamber heater temperature up to 35° C. Since I’ve moved the printer from a nice, appropriately heated office, to a cool damp basement while I work from home, heating the chamber and leaving the brim (a printed base layer of throw away material to allow the functional part of the print to be as smooth and stable as possible) in place, which I would normally leave out, was necessary for proper bed adhesion.
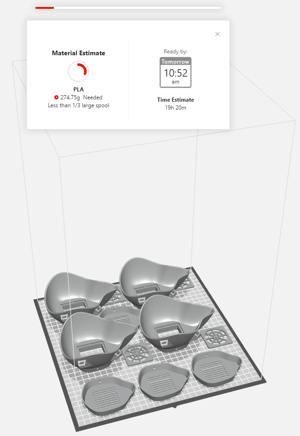
- Each print took roughly 15-16 hours for 4 masks, so I’ve been awake at random intervals throughout the week to change over the build plates and keep production number as high as possible.
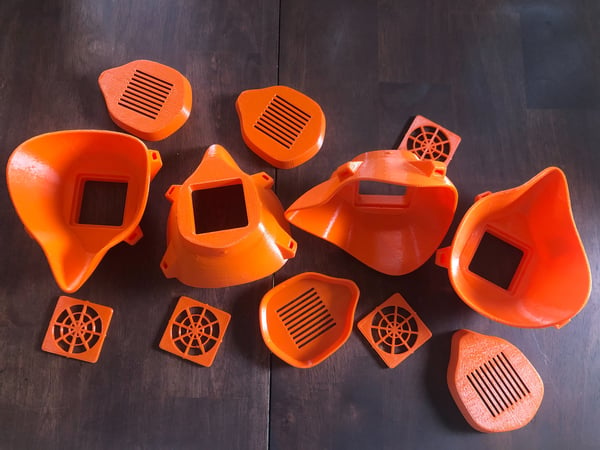
- To remove the print from the brim, I use a small folding knife from my letherman, and carefully lift the edges away from the scrap material. Sometimes, this process can leave behind more excess material than intended, so I must carefully continue scraping this base layer away until I’m left with a clean surface. The print also leaves behind some stringy material on steep overhangs, which I trim away with the same knife.
- Final assembly of the masks involves a few other purchased goods. The first is something to secure the masks around the head, 1/4-inch flat elastic ribbon is the go-to, but it’s been in short supply as the world struggles to keep up with production of these masks. If you find another width of elastic, it will likely fit, as the mounting points on the mask are sized large enough to force through a wider band if necessary , and if you’re using much larger than 1/2 inch, I would probably look to modify the design to house a wider elastic. The elastic can be either stitched to itself, or just tied off to the mask mounting points.
- To seal the edges of the mask around the face, we used 3/4-inch-wide by 5/16 inch thick self-stick foam rubber weather seal, paying careful attention to the nose area to ensure a good seal. Hot glue was used to further adhere the sticky side of the foam rubber to the inside edge of the mask.
- Lastly, a MERV 16 house filter was used to provide the actual filter element on these masks. MERV 16 filters won’t be easy to find in stores, but we’ve opted for these filters over the standard MERV 13 that you can find at most home improvement stores, as they match the 95% efficiency rating of N95 masks (hence the 95 in N95). The Lowell Makerspace is currently conducting tests with local hospitals to find the best filter materials and they’ll post those recommendations on their page when the data is available. In the meantime, try to use the highest MERV rating of house heating filter you can find, just be sure to avoid filters that contain fiberglass. To fit the filter, the house filter was disassembled, the pleated filter material was flattened, and cut into approximately 3 inch squares, enough to leave at least 1/4 inch of material on all sides of the mask grid piece and snapped into place and the front cover was installed to provide protection to the filter.
- The final cleaning process for these masks involves a wipe down with some sort of disinfectant wipe or spray, just be aware that alcohol based cleaners can cause the hot glue to un-stick, and they will go through a professional sanitization process provided by the hospitals prior to use.
Overall, this has been a very humbling experience, knowing that the issues we’re trying to address are far beyond any individual’s efforts. To help address these global issues, communities are coming together while remaining apart.
Do you want to help, too?
We are giving away PLA to anyone who is printing masks and needs help with supplies. If you have a 3D printer, are local, and need help procuring material to print more masks, please contact me at Ahren@pulsarsecurity.com.